
Thanks to static site generators, a blog can easily be driven and controlled by markdown files in a git repository. This way, it is not necessary to set up a content management system including a database ever worrying to end up hosting yet another hacked Wordpress instance. Instead one can focus on the content and publish by simply pushing to the main branch.
In the last couple of years I have been testing many new tools or, packages. Some turned out to be not really beneficial for the purpose I had in mind. But others found a permanent place in my toolbox. I used them more often, recommended them to colleagues and in some cases even created a tutorial or provided a training. At some point I decided to share such things with a wider community and create a blog for that, just as many others do it.
But how does one manage a blog these days? Years ago I had experimented with workpress and other php based content management systems (CMS). At the time these were good tools. When I did some research for available blog engines or CMS, I found out that the seasoned veterans like Wordpress or Drupal are still there. But that would have meant setting up a PHP application including a database. And especially keeping it up-to-date and securing it properly.The big CMS systems are well-known for being a preferred target of hackers (see e.g. here or here). There are more modern systems, e.g. the nodejs application Ghost. I think this is a really good choice. However it is not so different from the “admin” perspective. It is still a stateful service that needs to be managed.
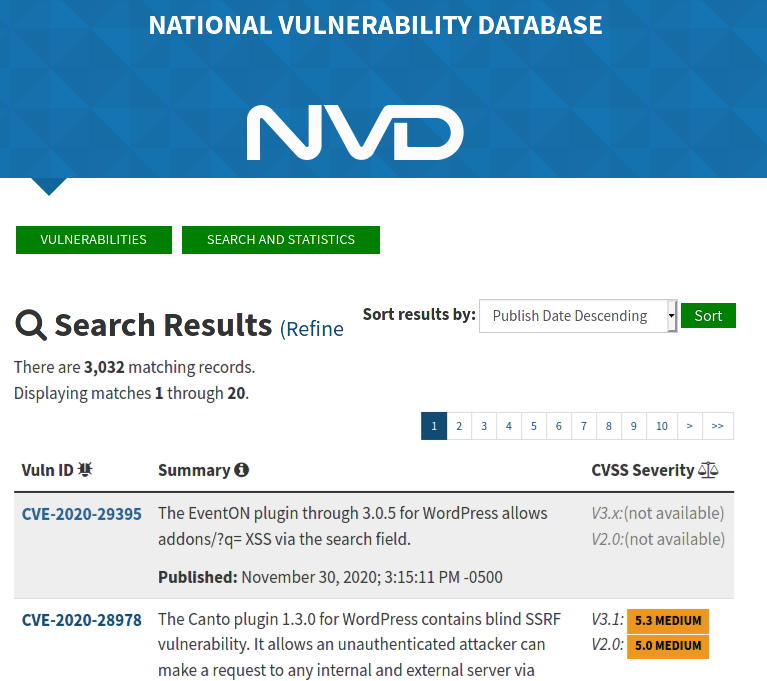 Search results for wordpress in the US national vunerability database
In the recent years I have learned that it is well possible to have the full configuration of any service under version control in a github repository and separate it cleanly from the data. And also, that it is possible to do updates via configuration changes and automation, without any manual intervention. That was what I wanted. The blog posts I wanted to write in Markdown, so also this could be put under version control and there would basically no data be left. So what for do I need a database then?
Inspired by a colleague who suggested to “simply put some markdown files on github” I remembered that there is “github-pages”, a feature of github which allows to publish certain content on static websites. We use that at work to host the documentation rendered from source code. I did some more research on the web and hit a blog post by Ciaran O’Donnel which describes very detailed Ciaran’s process of choosing a blog engine and how he ended up using github’s built-in static site generator. I decided to give it a try.
Static site generators
So, what is a static site generator? A classical dynamic web page generates the website on client request. It compiles static pieces like for example HTML templates, server-side includes and database fields as well as dynamic snippets generated by a scripting language such as PHP into the final web page which is delivered to the webbrowser. In contrast, a static site generator does this already ahead of time. It introduces an additional build step as part of the deployment process and pre-generates all possible views of the web page, so that the web server only has to deliver static content.
I can remember another form of static site generators from my first experiences with website creation in the late ninetees and early 2000s. Back then HTML editors like Frontpage and Dreamweaver were an alternative to writing HTML by hand. They promised a what-you-see-is-what-you-get experience. I found them rather unwieldy, they never did exactly what I wanted. Instead of getting “what I saw”, the generated HTML markup often contained a lot of autogenerated garbage that often looked completely different from browser to browser. But the main drawback with static sites in general was, that it wasn’t possible at first to have dynamic components in it. For example if you needed a login, an e-mail form or a guestbook page, it was always necessary to have some server side code running anyways. Therefore I soon switched to handcrafting the HTML and using something like PHP to render all pages into the same templates.
With the increasing use of RESTful webservices together with more and more powerful client-side scripting, the main disadvantage of static pages has become meaningless for content sites. Of course for complex web applications like web shops, server side scripting is probably still the way to go. But for pages which mainly deliver static content like text and images with some dynamic add-ons it really isn’t necessary any longer to generate pages dynamically. One can load all the dynamic parts via Javascript from dedicates services, so that a static HTML page with a little bit of embedded Javascript does the job very well.
So a newer kind of static site generators has evolved, addressing the needs of developers better than the classic tools. Some examples of this are Jekyll, Middleman or Hugo. With these, one can prepare the templates as plain HTML/CSS/Javascript files, while the content is typically written as plain text files in Markdown. This allows to keep the content completely under version control, similar to source code. When the text is written, the site generator compiles the markdown files into HTML and you only need a static webserver to deliver the content. No database is needed and no security issues with server-side scripting languages can occur.
Setting up a blog with Github-pages and Jekyll
Github offers the option to serve static websites via the built-in service “github-pages”. If you tell a github repository your own you can configure github-pages to create a web page from the contents of a certain folder or git branch. Per default the static site generator Jekyll is used to render the contents. This setup already offers enough functionality for something simple as a blog.
I am not going to detail out how to set up a page with Jekyll. There are loads of blog posts explaining it already really well. For example take a look at Kilt & Code or at Aleksandr Hovhannisyan’s blog and of course the section about github-pages of the very detailed jekyll documentation.
In essence, the result looks as follows:
- The actual text is written in markdown files. So the main page will end up in an
index.mdat the repository root and the blog posts as individual markdown files in the_postsfolder. One file per post and with minimum or no boilerplate around the actual content. - The configuration is managed in a Yaml file
_config.ymlat the repository root - The ruby environment used by the Jekyll script is defined in a
Gemfile, which is the standard way to organize ruby dependencies - Styling is done by plugins configured in the configuration files. For additional personal adjustments one can override all the html, css or javascript definitions by adding the relevant files to the repository. This way the start is easy (by using a standard style) but one has the full flexibility to adjust every single part of the templates.
- If you need any dynamic parts, e.g. a comment section, this can also be done by javascript snippets through external services like staticman. For such things there are typically also Jekyll plugins available. Alternatively one can also just add the necessary lines of javascript / html to the page templates.
This way, one can manage the configuration and styling together with the content in a git repository. Github provides a build process and a webserver where the rendered results are made available.
Self-hosting the blog
There are some restrictions when you use github-pages. For example you cannot get the webserver’s traffic statistics but have to rely on javascript based solutions like Google Analytics for such things. But it also easy to self-host the blog if you have some webspace available. The Jekyll documentation has a whole section about different deployment options.
As I do have some otherwise unused webspace I decided to go that way. I set up a github action for the build and deployment. It looks as follows:
# .github/workflows/main.yml
name: main

on:
  # Triggers the workflow on push or pull request events but only for the main branch
  push:
    branches: [ main ]
  pull_request:
    branches: [ main ]

  # Allows you to run this workflow manually from the Actions tab
  workflow_dispatch:

jobs:
  publish:
    name: 📖 Publish
    runs-on: ubuntu-latest
    steps:
    - name: 🚚 Checkout
      uses: actions/checkout@v2.3.2
    - name: 🏗 Jekyll build
      uses: jerryjvl/jekyll-build-action@v1
    - name: 📂 Sync files
      uses: sebastianpopp/ftp-action@v2.0.0
      with:
        host: ${{ secrets.DEPLOY_HOST }}
        user: ${{ secrets.DEPLOY_USER }}
        password: ${{ secrets.DEPLOY_PW }}
        localDir: "./_site/"
        forceSsl: true
This defines a simple three-step job named “Publish” which checks out the repository, builds the static pages with Jekyll and then pushes the result from the _site folder to the webspace via FTPS. On the webhost a managed Apache server is watching the folder and serving the files. The secrets are stored on github in the repository settings.
This job is automatically triggered on every change to the main branch. This way I don’t have to deal with the whole CI/CD process but can focus on writing.
Publishing the GitOps way
Now with this set-up, how does the publication process look like and why do I call it “the GitOps way”?
Well, simply because there is nothing else than the git repository. Everything else is automatically handled by the github automation which fetches the writings on every commit, renders the HTML files and updates the blog. You don’t have to deploy anything yourself. No software updates are needed and no database needs to be maintained. So if you host such a page on github, this is very convenient. Let’s quickly talk about the workflow for editing the blog.
Writing a post
This is how a blog post is created: I would check out the repository, create a new markdown file (e.g. _posts/2020-12-01-Test-Post) and just start writing:
---
layout: post
title:  "Test Post"
description: Short summary for the main page
tags: ["blog"]
---
This is a dummy post with a [link](http://wikipedia.org)
and many more words...
You see that the markdown file has a little header, defining the page layout (one of the pre-defined or custom templates). Also with the extensions I’m using one can define the title and a short summary of the post. These things can be shown for example in the list of recent posts on the main page. The rest of the file is plain Markdown.
When I’m done, I simply do git commit and git push and the post is online.
Drafts
There are multiple options for drafts. The built-in functionality of Jekyll is to use a special folder _drafts instead of _posts. This way the draft is only visible when running Jekyll with the command line flag --drafts. To preview locally the command would be:
bundle exec jekyll server --drafts
The approach which I prefer is to create a “feature branch”. That means I write the post in a separate git branch, say test-post. When I’m done I merge this branch into the “main” branch. This could even be done online via pull request. This would also allow people working together on a blog to establish a review process before publishing.
Working remotely
Because github offers support for markdown files out-of-the-box, there is no need for a local environment. One can also write directly on the github web page from any device. Of course the preview is not full-featured then. The only difference is that the preview is in the github style instead of the final Jekyll theme.
Summary
In this post I went through the minimalistic setup of a blog with Jekyll and Github. This way one only works with git and markdown files, which just feels natural to me. You don’t have to deal with the overhead of a database or of maintaining a content management system. Static site generators have become very mature and with Jekyll a flexible and extremely well-documented solution is available. But the core message of this post is the simple and pure workflow that you get when you work with a static site generator in conjunction with a github repository. Once everything is set up there is no need to worry about the “hosting” part in hosting your own blog anymore.